


maintenance services
ALL ARTICLES
SHARE
Two-Sided Marketplace Payments with Stripe
Flatirons
March 24, 2023
Business
•14 min read

Two-Sided Marketplace Overview
Two-sided marketplaces are ubiquitous across the web and mobile apps. In a two-sided marketplace, the marketplace payments platform essentially acts as a broker between a buyer and a seller. The marketplace is used to advertise the offering and attract customers to the platform, and in exchange, they most likely take cut-off transaction payment fees.
Examples of popular multi-sided marketplaces include Uber, Lyft, Rover, eBay, Upwork, and Fiverr. All of these are very popular platforms where a buyer buys goods or services, a seller provides goods or services, and payment is made from the buyer to the seller with the platform taking a percentage of the transaction. Being able to take a cut of transactions is the fundamental business model of a two-sided marketplace.

Examples of Two-Sided Marketplaces

There are many two-sided marketplaces online, some of which we use on a regular basis. Here are some common two-sided websites and apps.
Uber & Lyft
Uber and Lyft are two-sided ride-sharing marketplaces that facilitate efficient rides between riders and drivers. These platforms take a percentage of the ride fares.
Rover
Rover allows pet owners to book overnight pet sitters and pet walkers to take care of their pets. In exchange, Rover takes a cut of transactions.
Upwork
Upwork is a popular platform for finding contractors to do various online services like software development, software design, marketing, etc. It contracts can be fairly expensive if the fit is right, and it takes a percentage of them in exchange for brokering a match.
Amazon
Amazon is both a one-sided marketplace and a two-sided marketplace. Sometimes, items on Amazon are for sale by third parties, and they actually act as a platform that connects buyers and sellers.
Processing Two-Sided Marketplace Payments with Stripe
Stripe Connect allows you to power all sorts of custom payment flows. Naturally, subscriptions and one-time payments are two of the most popular payment flows to build with Stripe. These are soft of the de-facto use cases for payments with Stripe. Luckily, the Stripe API has been written to handle payments of all different complexities.
An example of a more complex payment flow can be found in two-sided marketplaces like Uber, Airbnb, or Rover. In these marketplaces:
- Buyers buy goods or services from sellers
- The platform holds onto funds
- The platform releases funds after goods or services have been provided
Let’s take a look at how Stripe Connect can be used to power the payment flows for two-sided marketplaces.
Step 1: Seller Registration
In this step, we will create a Stripe Custom account for the seller and associate their bank information with it. This is essentially the process of giving the seller their own Stripe account behind the scenes. They won’t know that the Stripe account exists, because you will manage it manually with code. But you can access it through the Stripe UI and perform the standard Stripe API calls on it.
In order for a seller to list their services on the platform, they need to register and provide their bank account details. Their bank account will be used to send them any payments that they receive from buyers. To sellers and service providers, it appears to be the way that they are able to accept payments through your platform. Requiring sellers to enter full bank account details prior to listing their services is generally good for security as you want to ensure that you have real users with real intent listing their goods or services on your platform.
There are numerous parts of the seller registration flow. Let’s take a look at what the seller has to do, and how your platform should interact with Stripe during the registration flow:
Seller enters registration information
Like any other web application, you will require sellers to sign up before listing their services on your two-sided marketplace. During this process, you will have them agree to the terms of your website. These terms are likely to have details regarding payments and dispute resolution, which are key parts of the two-sided marketplace platform business model.
Seller enters bank account information
In this step, we will have the user enter their bank account details, which we will send to Stripe. Make sure to collect full details including SSN.
Seller Uploads Verification Document
You will need to collect a valid identity verification document from the seller, including the back and front of the ID. You will give these to Stripe for identity verification.
Create a Stripe Custom Account for the Seller
To create a Custom Account in Stripe for your seller, use the Create Account API.
We will be paying users out manually in this payment flow. Thus, we need to disable automatic payments from the seller’s Stripe Account to their bank account. In the case of Airbnb, a payment would likely be made to a host after a guest checks out. For Uber, a payment could be made to a driver after a rider gets out of their vehicle perhaps. In your application, you will want to control when payments are delivered to buyers, so disabling automatic transfers from their Stripe Account to their bank account is a good idea. Read using manual payouts for more information. You can disable automatic payouts from the seller’s Custom Stripe Account via the Create Accounts API by setting the following:
By default, Stripe will send payouts on a regular interval, but when you change this setting to “manual” it will wait for you to perform payouts through the API.
Create a Person in Stipe Representing the Business Owner
You will need to give Stripe some information about the business owner and attach it to the Stripe customer.
Create an External Account for the Seller
Next, you will want to attach the seller’s bank account to their Stripe Account. This is done by creating what is called an “External Account” on Stripe. See the documentation to create an external bank account. Similarly, to how credit card payments are processed, we recommend using Stripe.js to send bank account details to Stripe so that sensitive bank account fields do not cross your server. When you create an external account for the bank account, it will become the default external account for the seller’s Stripe account.
Store the Seller’s Stripe Account id in your database.
You will need to access the seller’s Custom Stripe Account later on in order to pay them for goods or services, so store the id of their Stripe Account in your database.
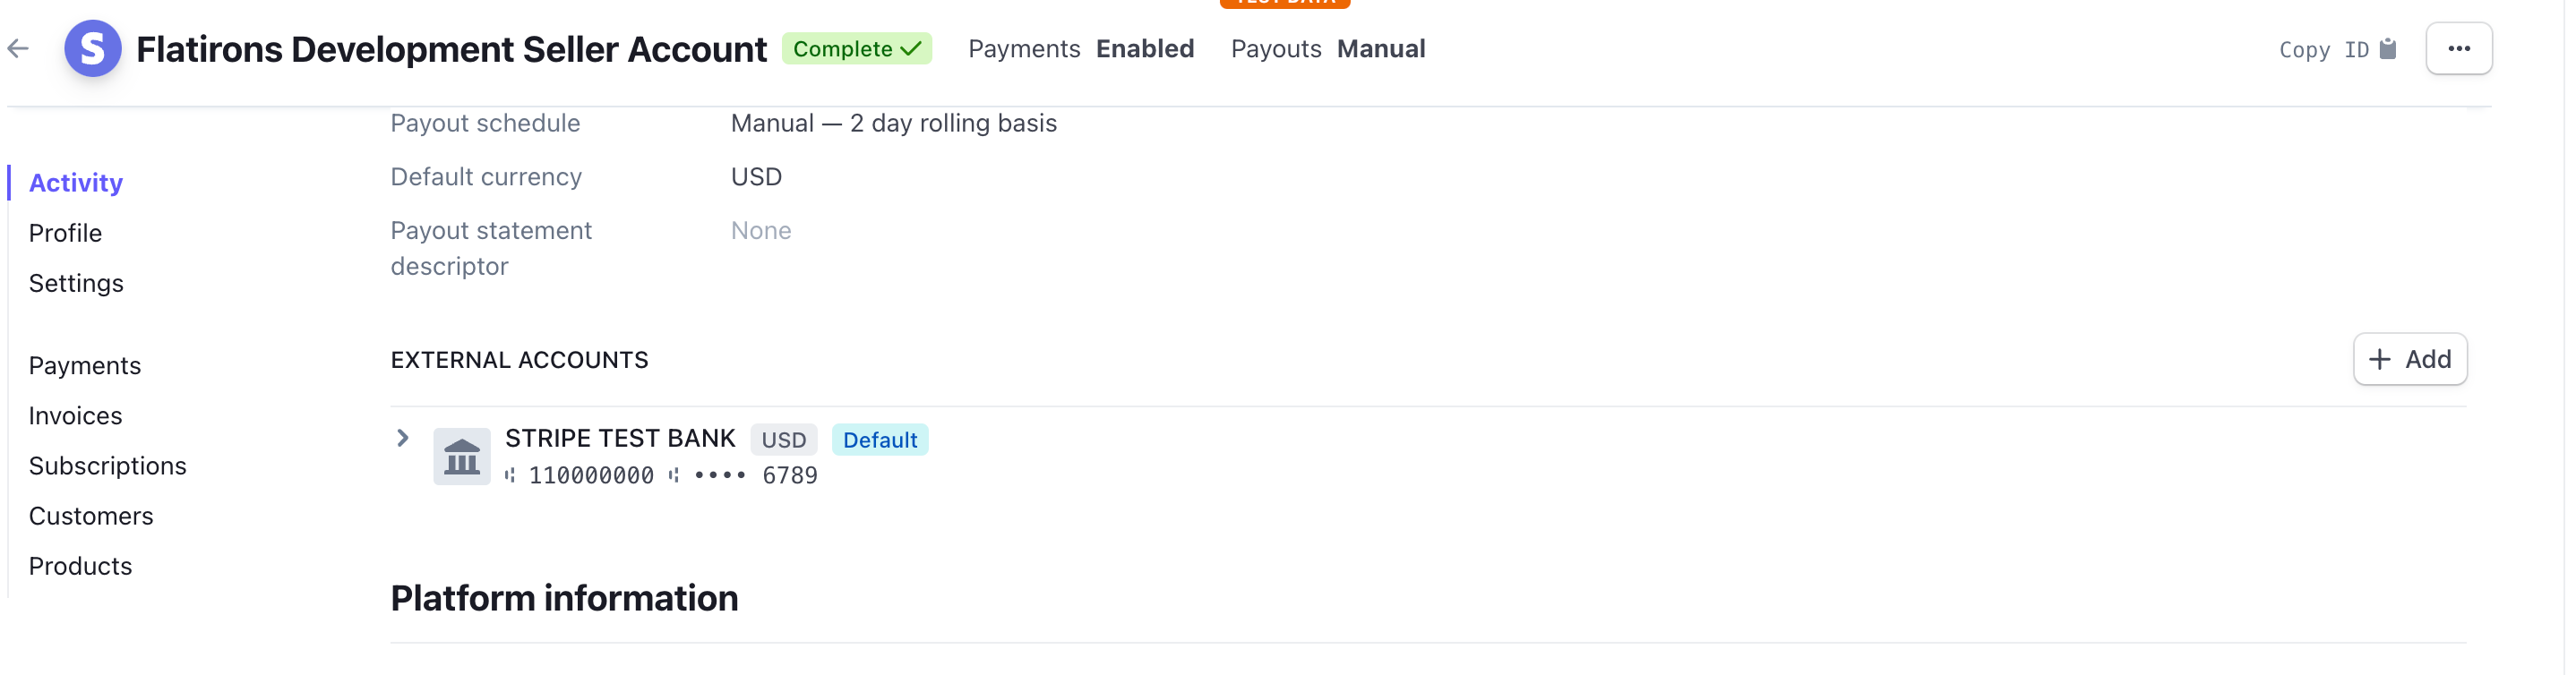
Here��’s what a successfully signed-up seller account might look like:
CODE SAMPLE
Here is a code sample in Ruby demonstrating the API calls required to create the sellers account in Stripe:
require 'stripe'
Stripe.api_key = 'sk_test_.....'

# Create Stripe Account for Seller
seller_account = Stripe::Account.create({
  type: 'custom',
  country: 'US',
  email: 'seller_account@flatirons.com',
  business_type: 'company',
  capabilities: {
    card_payments: { requested: true },
    transfers: { requested: true },
  },
  tos_acceptance: {
    ip: '127.0.0.1',
    date: Time.now.to_i
  },
  business_profile: {
    mcc: 5734,
    url: 'https://flatirons.com',
    support_url: 'https://flatirons.com/contact-us/',
    name: 'Flatirons Development Seller Account',
    support_email: 'info@flatirons.com',
    support_phone: '+18888888888',
    support_address: {
      city: 'Boulder',
      country: 'US',
      state: 'Colorado',
      line1: '1 Pearl Street',
      postal_code: '80301'
    }
  },
  company: {
    address: {
      city: 'Boulder',
      country: 'US',
      state: 'Colorado',
      line1: '3080 Pearl Street',
      postal_code: '80301'
    },
    directors_provided: true,
    executives_provided: true,
    name: 'Flatirons Development Seller',
    owners_provided: true,
    registration_number: '011881111',
    tax_id: '011881111',
    phone: '+17201111111',
  }
})

# Upload an Identity Document to Stripe
front_of_identity_document = Stripe::File.create({
  purpose: 'identity_document',
  file: ::File.new('./identity_document.jpeg')
})

back_of_intentity_document = Stripe::File.create({
  purpose: 'identity_document',
  file: ::File.new('./identity_document2.jpeg'),
})

# Add an Owner to the Seller's Business in Stripe
Stripe::Account.create_person(
  seller_account.id,
  {
    first_name: 'Andrew',
    last_name: 'Jackson',
    email: 'info@flatirons.com',
    id_number: '111111111',
    phone: '+18888888888',
    ssn_last_4: '1111',
    address: {
      city: 'Boulder',
      country: 'US',
      state: 'Colorado',
      line1: '3080 Pearl Street',
      postal_code: '80301'
    },
    dob: {
      day: '20',
      month: '04',
      year: '1966'
    },
    relationship: {
      owner: true,
      representative: true,
      title: 'CEO'
    },
    verification: {
      document: {
        back: back_of_intentity_document.id,
        front: front_of_identity_document.id
      }
    }
  }
)

# add a bank account to the seller's custom stripe account
# you might use Stripe.js to create a token for the
# bank account and set that here instead
seller_account.external_account =
{
  :object => 'bank_account',
  :country => 'US',
  :currency => 'usd',
  :routing_number => '110000000',
  :account_number => '000123456789',
}

# Turn off Automatic Payment in the seller's account
seller_account.settings = {
  payouts: {
    schedule: {
      interval: 'manual'
    }
  }
}

# Wait for seller account to move from pending status.
# Obviously this is not a good way to do this in production
while seller_account.capabilities.transfers != 'active'
  sleep 10
  seller_account.save
end
Step 2: Buyer Buys Goods or Services from the Seller
Buyer Enters Registration Information
Again, you need basic user registration and acceptance of terms for buyers.
Buyer Pays for Goods or Services
Additionally, the buyer will provide their credit card or other payment information and submit their payment information to your platform. Until the seller provides goods or services to the buyer, you will hold these funds.
The payment flow here is a slight twist on classic Stripe Connect payments. The major difference is that you have to manually distribute money between your own Stripe account and the Custom Account that you created for the seller.
If you are not familiar with how credit card payments are processed on Stripe, the graph below may help:
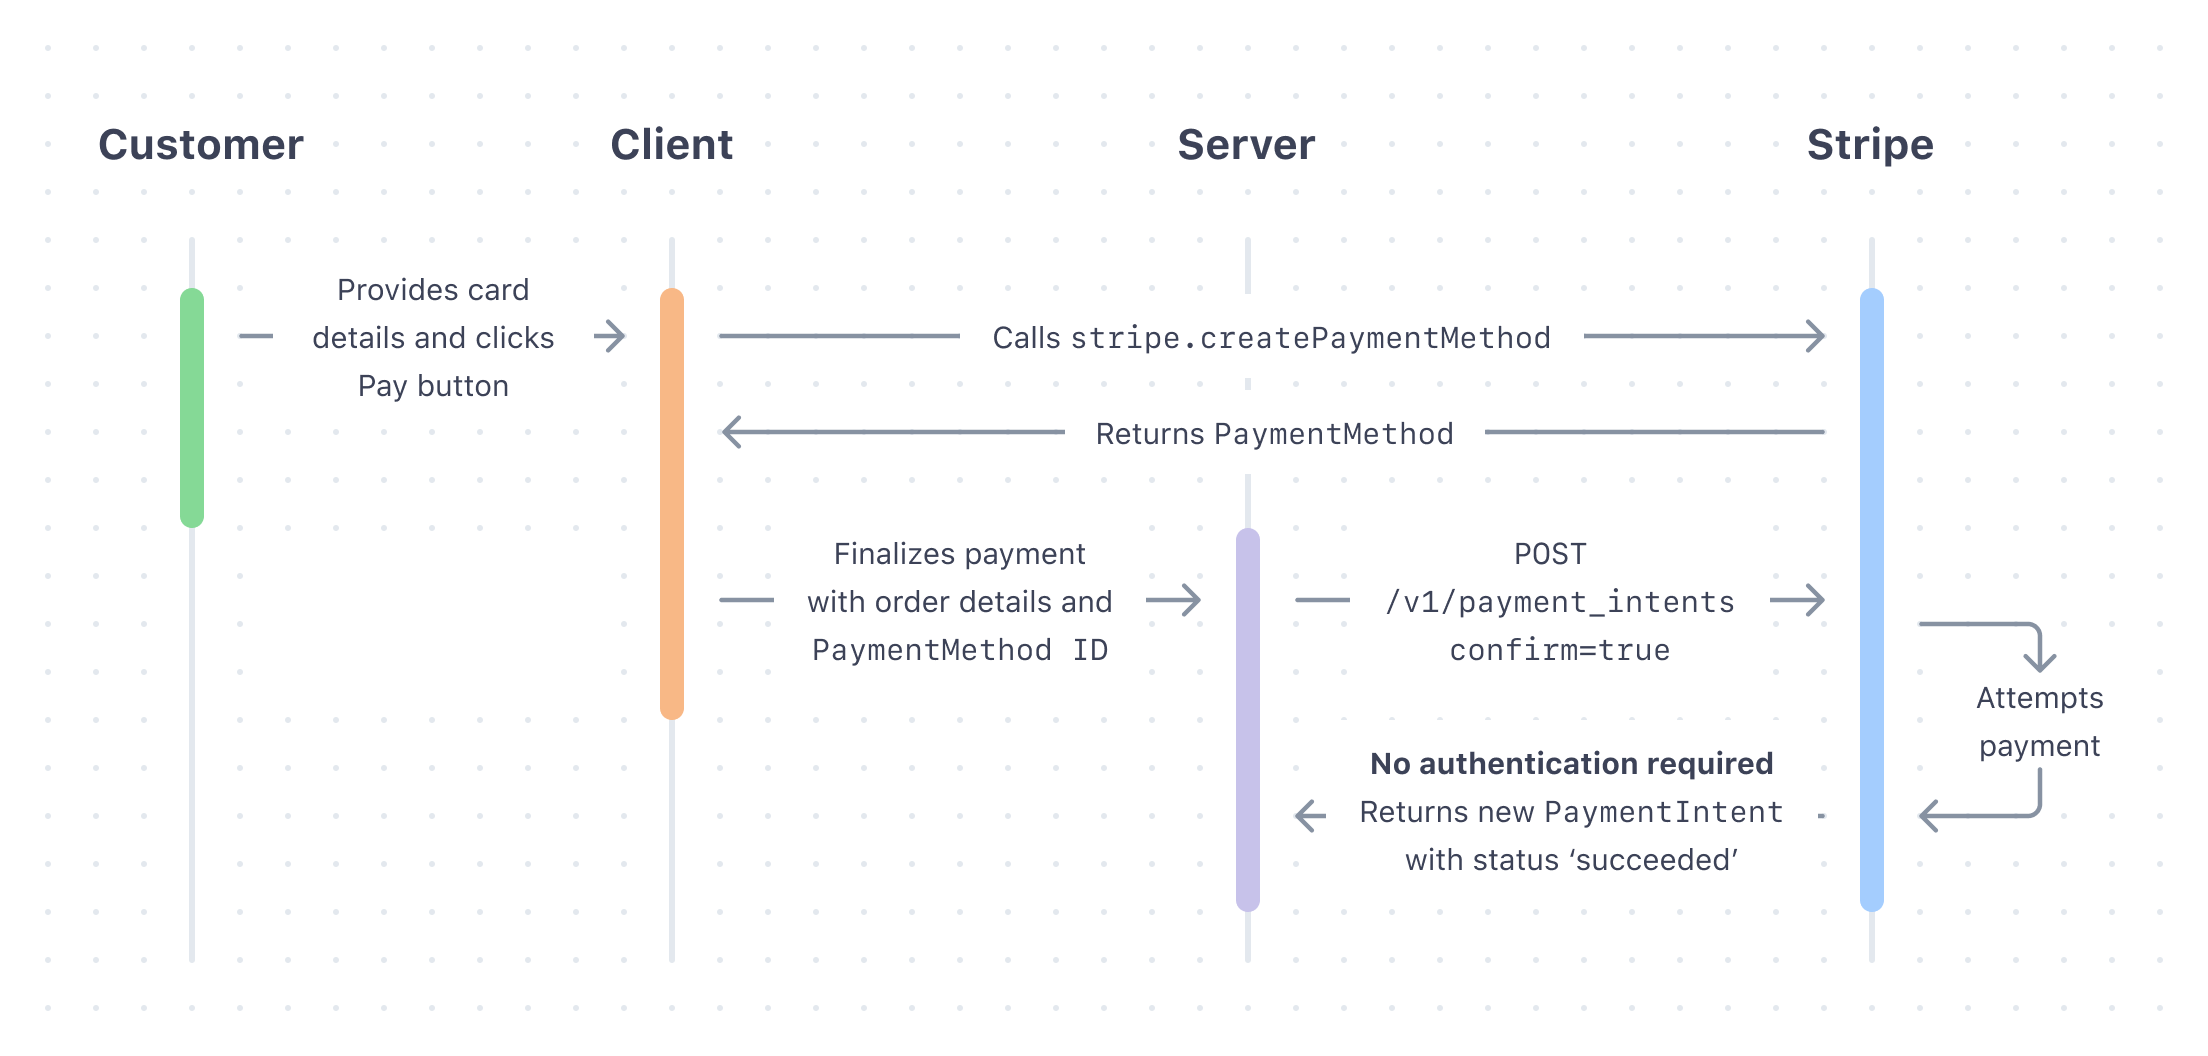
While this flow might seem complicated at first, it is actually quite simple. Long story short, you do not want to deal with PCI compliance, so you should not pass credit card details to your own server. Thus, the payment flow looks like this:
- The front-end of your website will communicate directly with Stripe to submit credit card details
- Stripe will return a token that represents that credit card to your front-end application
- Your front-end can pass that token to your backend, and your backend will use the Payment Intents API to finalize the payment
It’s a lot to process the first time you do it, but when you realize that Stripe’s experience is designed to protect your website from having to deal with PCI compliance, it makes a lot of sense.
Stripe Takes Their Payment Processing Fee
Stripe fees will be deducted from the total amount that the buyer pays. This is important to remember so that you can accurately describe how payment flows to Stripe, to yourself, and to sellers on the platform. It is also important to keep in mind Stripe fees when calculating the percentage of transactions that your own platform takes.
You Transfer Funds to Multiple Stripe Accounts
Now that Stripe has taken their fees out of the amount paid, you need to distribute the remaining amount between your platform and the seller. You can do some by distributing some money to the platform’s Stripe account, and the rest to the seller’s Stripe account (which you created for them).
To finalize the payment from buyers and to transfer funds, you will use the PaymentIntents API. There are a few parameters you want to pay attention to in this use case:
- application_fee_amount is the amount that your platform will take out of the transaction.
- transfer_data[destination] should be your seller’s Stripe Account ID.
- amount is the amount the buyer is paying
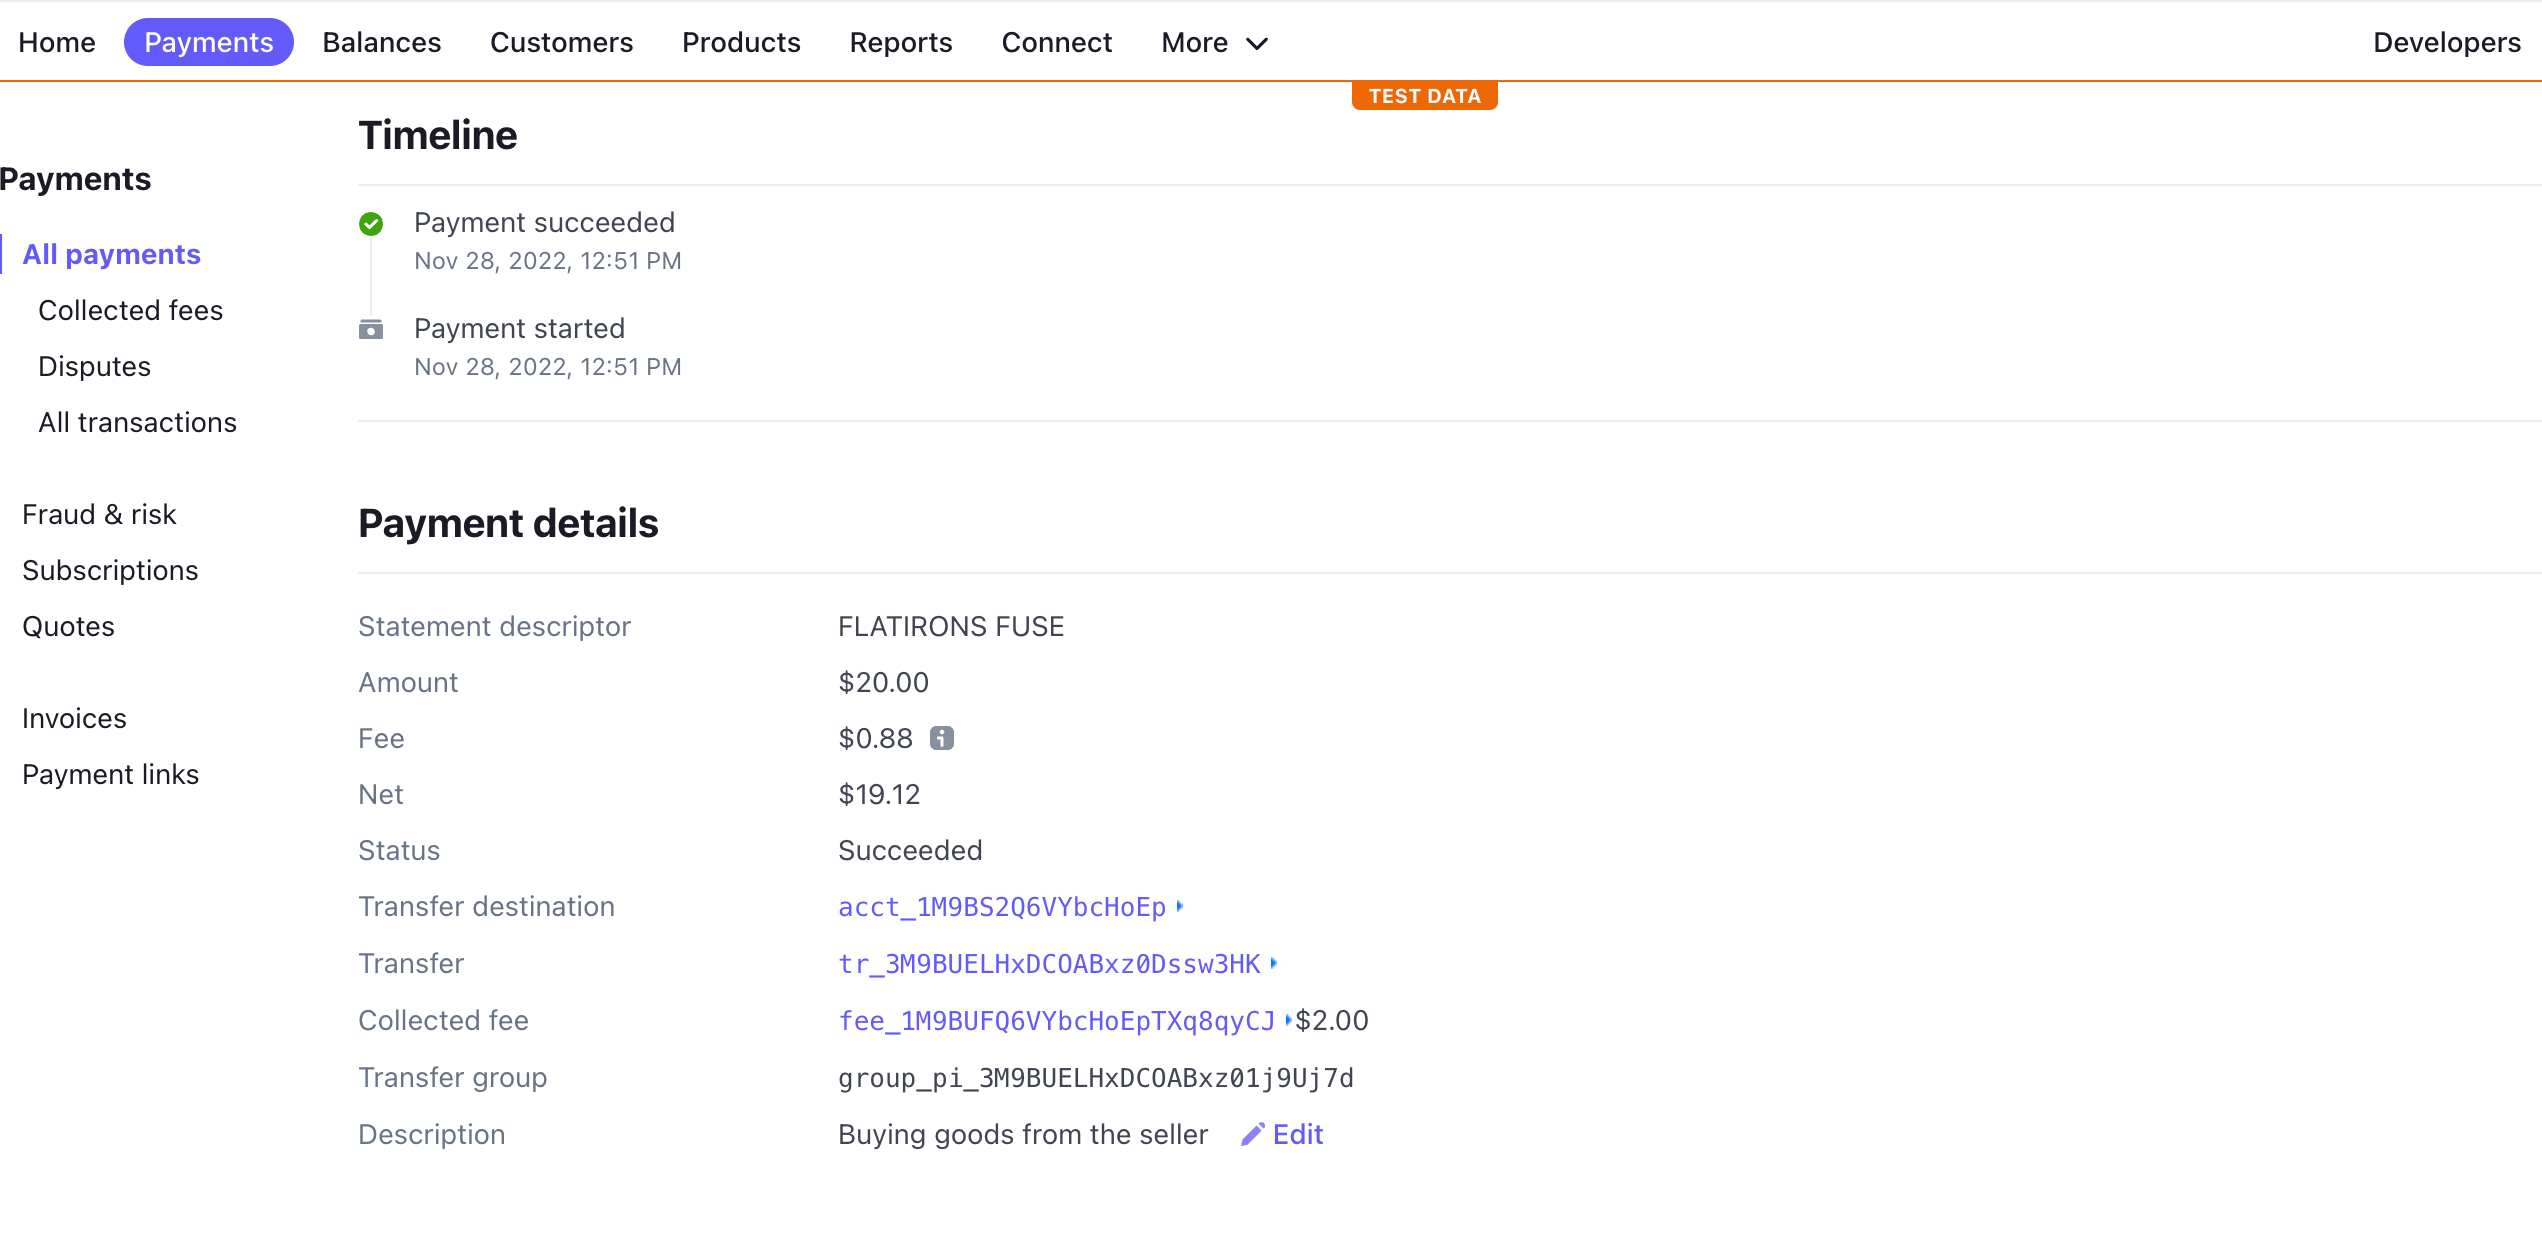
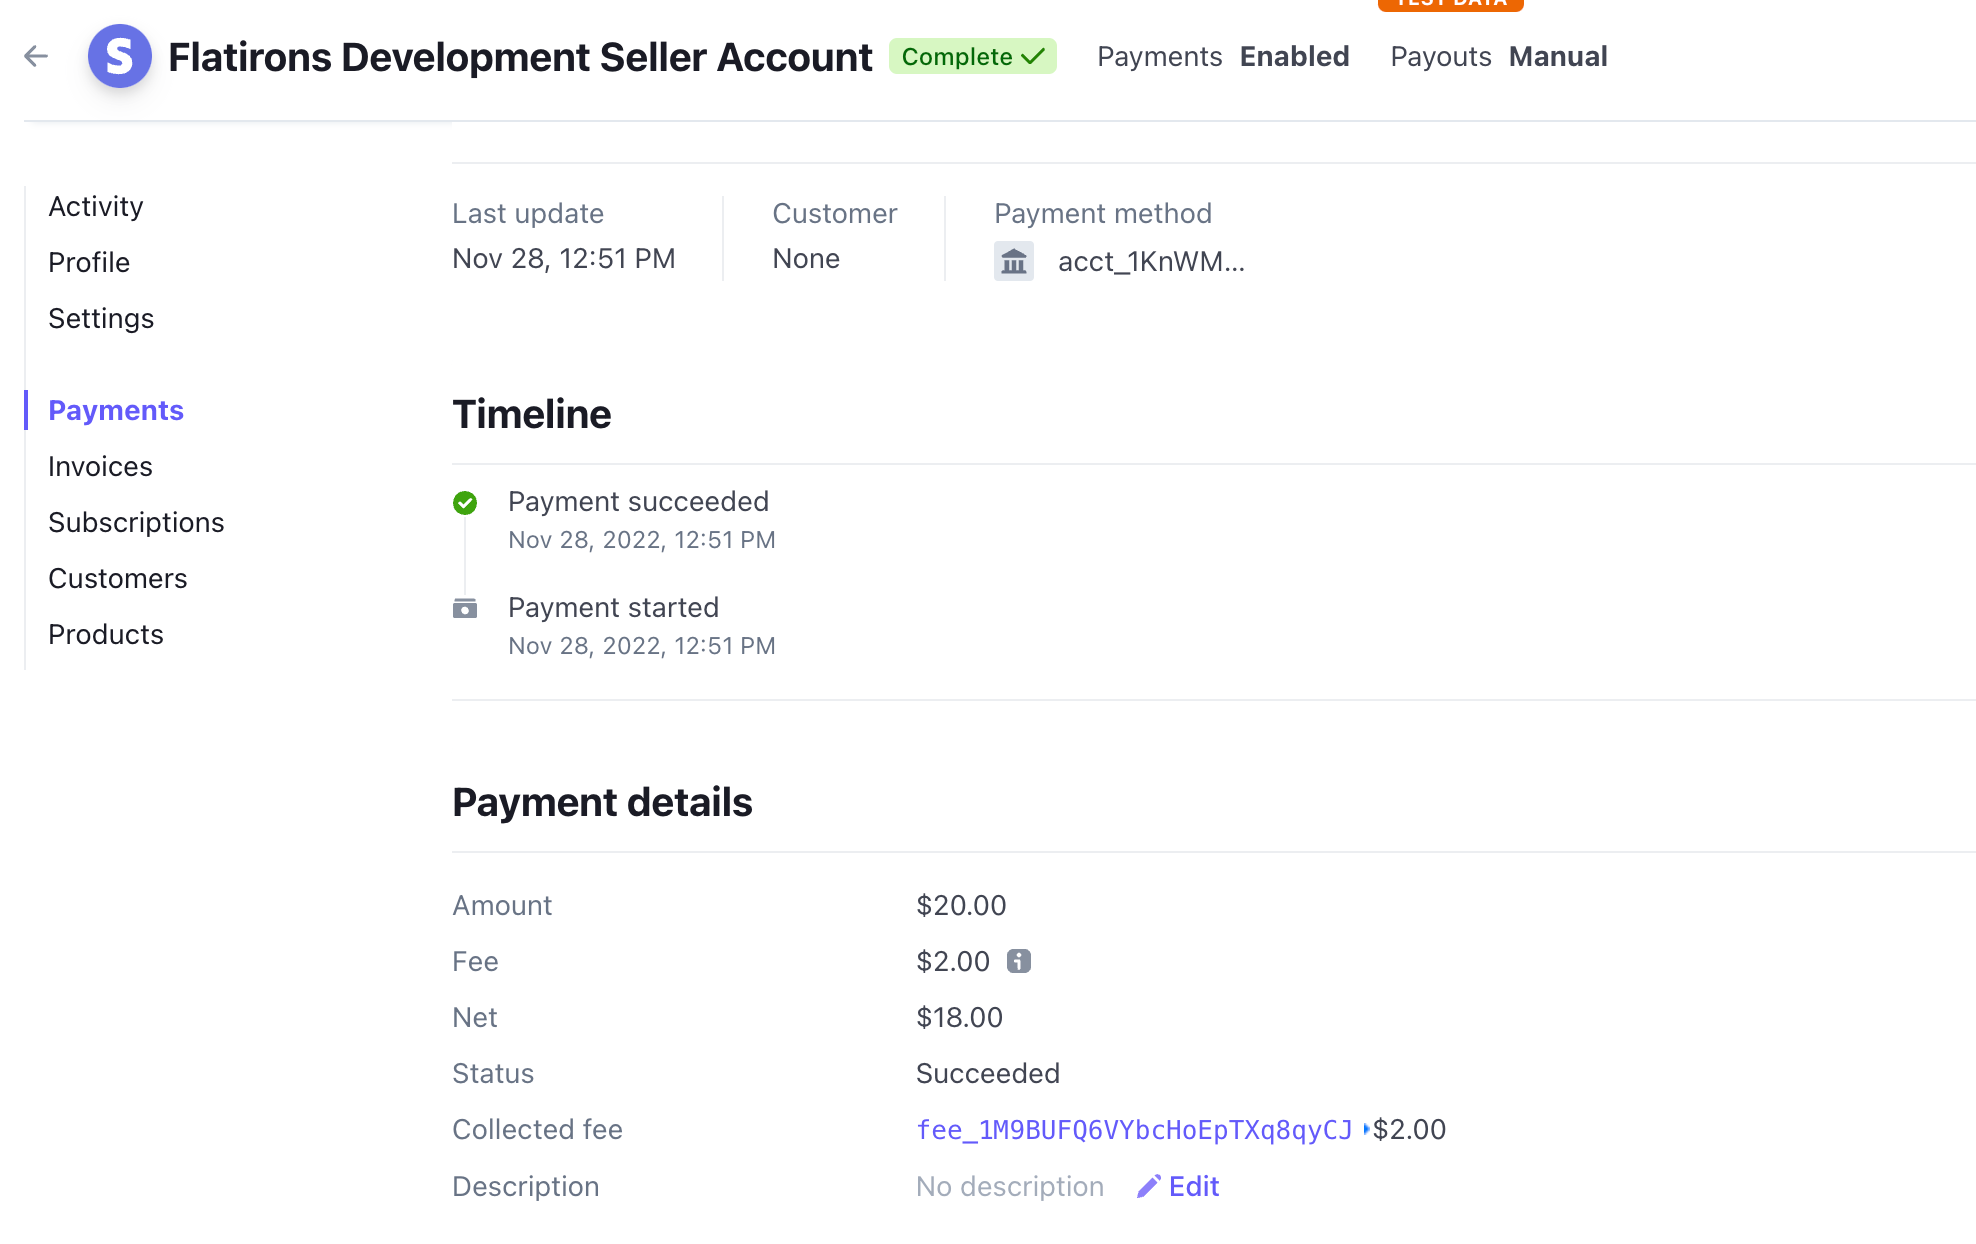
At the end of this step, your Stripe account should have funds, and so should the seller’s Stripe account. Below are screenshots of what a successful transaction looks like in your account, and in the Seller’s account. Notice the $2.00 removed from the amount the seller is receiving.
Here is a code sample that shows how to create a confirmed payment intent. This API call will:
- Charge the card passed to the PaymentIntent
- Send the Application Fee to the platforms Stripe Account
- Transfer the rest of the money to the Sellers Stripe Account
intent = Stripe::PaymentIntent.create({
  description: 'Buying goods from the seller',
  amount: 2000,
  currency: 'usd',
  payment_method_types: ['card'],
  confirm: true,
  application_fee_amount: 200,
  transfer_data: {
    destination: seller_account.id
  },
  payment_method: 'pm_card_visa'
})
intent = Stripe::PaymentIntent.create({
description: 'Buying goods from the seller',
amount: 2000,
currency: 'usd',
payment_method_types: ['card'],
confirm: true,
application_fee_amount: 200,
transfer_data: {
destination: seller_account.id
},
payment_method: 'pm_card_visa'
})Step 3: Seller Provides Goods or Services to the Buyer

This step most likely happens offline from your platform. On Airbnb, this is the part of the transaction where the renter stays at the host’s home. On Upwork, it’s when a service provider performs the work they were hired to do. In Uber, this is where the driver drives the rider to their destination. During this time, you won’t do anything with the funds that the buyer has deposited into Stripe. Later on, after services have been rendered, you will handle payouts.
Step 4: Two-Sided Marketplace handles Payouts
After services have been rendered, it’s potentially time to pay the seller. There are two potential flows here:
FLOW 1: The buyer doesn’t dispute services
If the buyer doesn’t dispute the services provided by the seller, you can pay the seller out. Do so by manually paying out funds from the seller’s Custom Account to their External Account.
payout = Stripe::Payout.create(
  {
    amount: 1000,
    currency: 'usd',
  },
  { stripe_account: seller_account.id }
)
payout = Stripe::Payout.create(
{
amount: 1000,
currency: 'usd',
},
{ stripe_account: seller_account.id }
)FLOW 2: THE BUYER DISPUTES SERVICES
Here, things get a bit more complicated. You will typically want to hold onto funds until you have handled dispute resolution. If your dispute resolution processes determine that the seller should still be paid, you will use the same process for distributing funds as in Flow 1.
If your dispute resolution process determines that funds should be returned to the seller, you will do two things:
- You will reverse the transfer from the seller’s Custom Account.
- You will refund the buyer.
Luckily, both of these actions can be performed with one Stripe API call.
refund = Stripe::Refund.create({
  payment_intent: intent.id,
  refund_application_fee: true,
  reverse_transfer: true
})
refund = Stripe::Refund.create({
payment_intent: intent.id,
refund_application_fee: true,
reverse_transfer: true
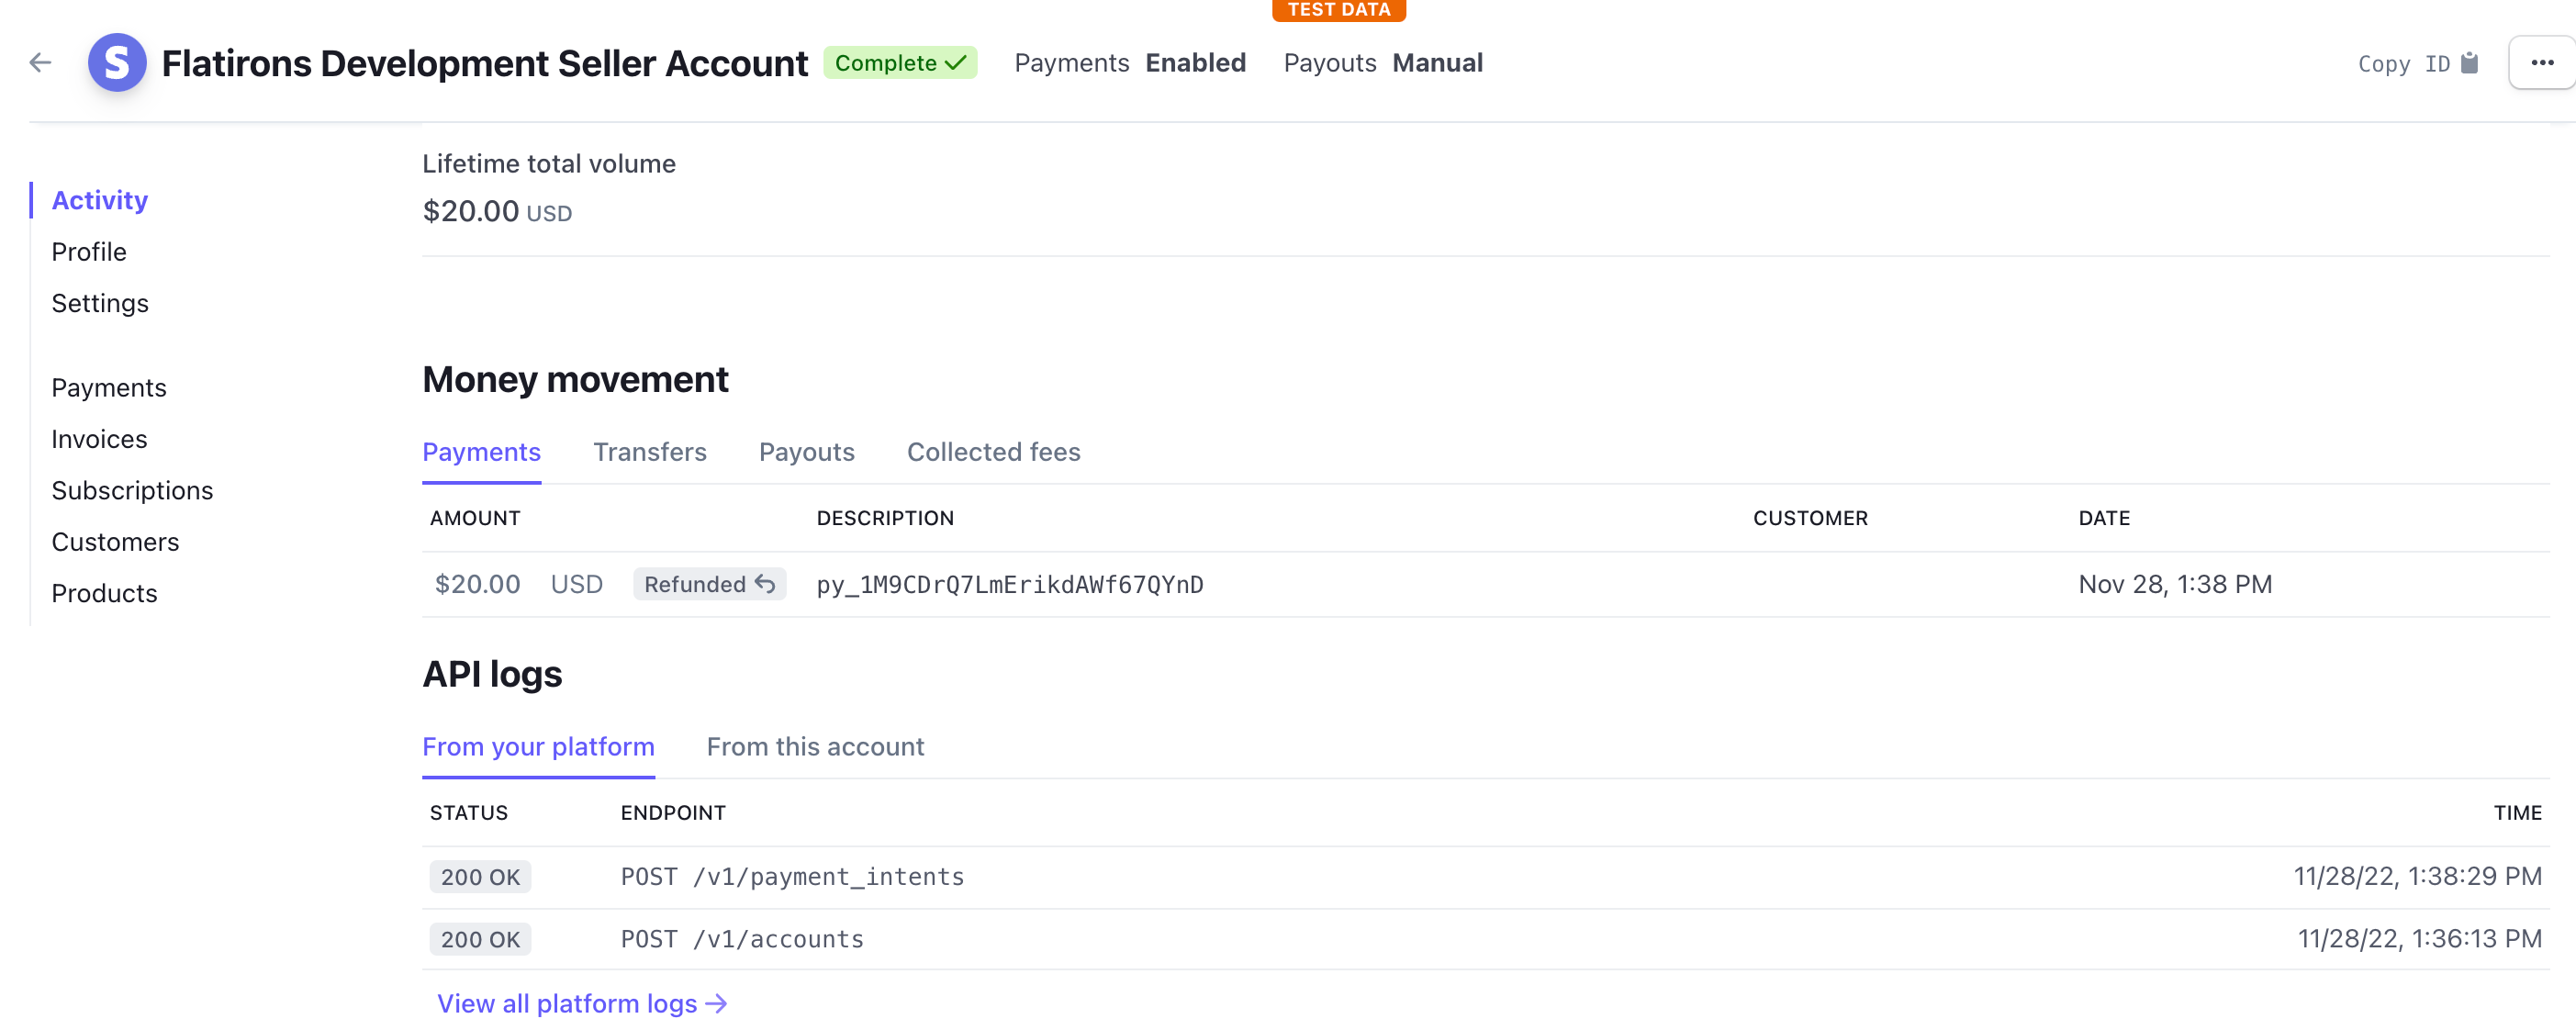
})See what a successful PaymentIntent refund looks like in the seller’s account:
Accepting Payments with Custom Stripe Integrations

That’s it! There’s can be a lot involved with custom Stripe integrations, as you can see above. If you need to implement multi-sided marketplace payments or another complex payment flow, Flatirons has an expert team of Stripe developers. Contact us today to discuss your next project.
Fintech Software Development Services
Flatirons delivers cutting-edge fintech solutions, driving innovation in financial technology.
Learn moreFintech Software Development Services
Flatirons delivers cutting-edge fintech solutions, driving innovation in financial technology.
Learn moreFlatirons
March 24, 2023
More ideas.

Development
Software Outsourcing Market: Ultimate Guide 2024
Flatirons
May 08, 2024
Development
What Is Code Churn?
Flatirons
May 07, 2024
Development
The Best IDE for React Developers
Flatirons
May 06, 2024
Development
Refactoring vs. Rewriting Legacy Code
Flatirons
May 05, 2024
Development
What is React or React.js? A Guide in 2024
Flatirons
May 04, 2024
Development
Software Development in Colombia: Ultimate Guide in 2024
Flatirons
May 03, 2024our company
design services
engagement models
Resources

Our multi-disciplinary teams are ready to deliver you the mobile application of your dreams.
